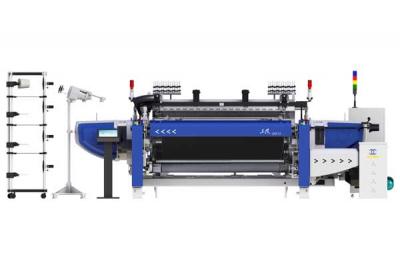
Four Things You Need to Know About Tuck-in Selvedge Device
Due to the limitation of shuttleless looms in weft insertion, most of their fabrics have rough edges, but clean selvedge can also be achieved with the help of a tuck-in device.
2. The selvedge tuck-in device should keep synchronous motion with the loom to ensure that the weaving crankshaft rotates for one time, the tuck-in device completes a tuck-in action--hooking the weft tail of the previous picking into the weaving shed. At present, the rotation speed ratio of all the tuck-in device and the loom is 1:1.
3. The installation position of the tuck-in device should be reserved on the chest beam of the loom. Ensure that the tuck-in device can reach the corresponding position matching the front, back, up, and down directions of the weave shed, and the position should be adjustable in the widthwise direction. The installation should be firm to ensure that no large vibration during running.
4. The tuck-in device is equipped with its own scissors for weft cutting. Therefore, the fabric retainer plate of the loom should be movable, and the length adjustable. Each time weaving, the fabric retainer plate should be adjusted precisely matching the reed width to avoid hindering the tuck-in device's movement. For a loom without installation of a tuck-in device, the fabric retainer plate can be a fixed type or movable type, but the movable type must be used after the tuck-in device is installed.
5. The form of weft cutter must match with the tuck-in device. The weft cutter should be bent toward the weft insertion side to shorten the distance between the weft cutter and the tuck-in device's scissors on the weft insertion side; this distance is the width of the waste edge. That is to say; the weft yarn utilization rate can be improved after bending the weft cutter, as shown in Fig.1.
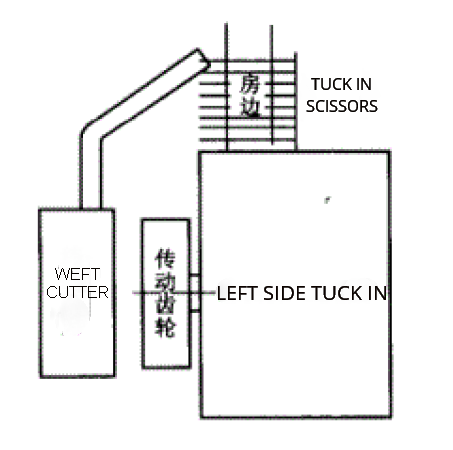
Fig.1 Fig.1 Bending structure of weft cutter
6. The tuck-in device will occupy the position of previous temples, so the temples' installation method has to be changed. The model and style temples should match with the tuck-in device and connects to the base tuck-in device.
7. Various types of independent waste edge devices are used; some are fixed on the loom chest beam, and some are installed in front of the heald frame. The installation of tuck-in device will occupy the position of waste edge on the chest beam. Therefore, if the tuck-in device is to be used, the independent waste edge device must be installed in front of the heald frame, or a new design for the original independent waste edge.
The tuck-in device has many models due to different uses and different models of looms, each with different structures. But the most used tuck-in device is to weave fine wool fabric on rapier looms. Below is the tuck-in device used on the SOMET Thema Excel loom, illustrating the structure and principle of the box and execution parts.
The device consists of two tuck-ins, left and right, placed on both sides of the cloth edge, and used in pairs. Fig.2 shows the tuck-in device.
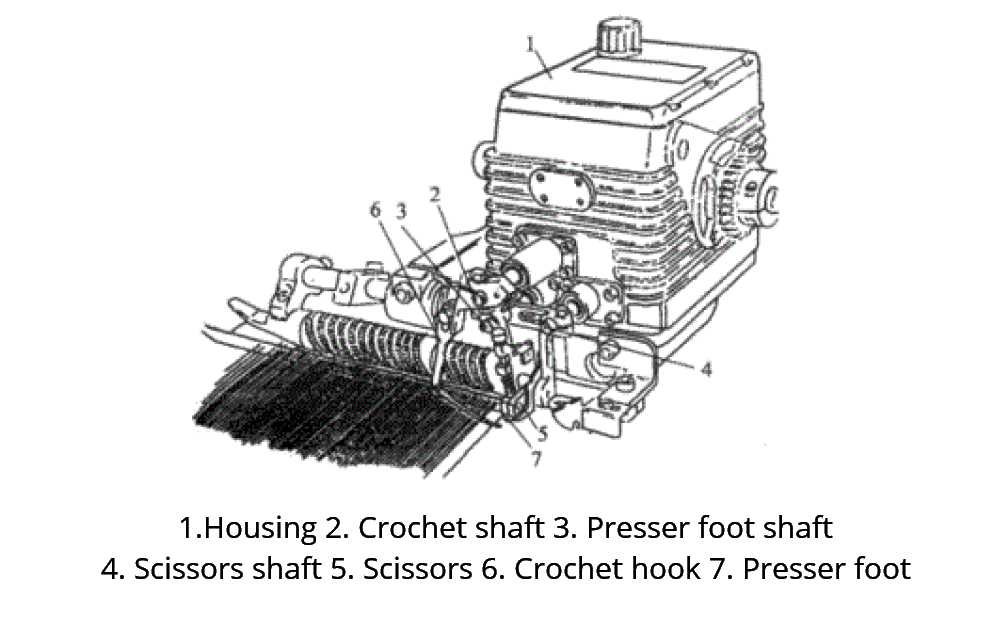
Fig.2 Structure of Tuck-in Device
There are 4 sets of conjugate cams in the housing 1, controlling the axial reciprocating movement of the crochet shaft 2, the presser foot shaft 3, the scissors shaft 4, and the movement of the crochet shaft through the swing arm and connecting rod. The execution mechanisms of crochet hook 6, the presser foot 7, and the scissors 5 are installed respectively on three shafts, through which the actions of pressing, shearing, and hooking can be conducted.
After the introduced weft yarn beaten up by the weaving reed and woven by the selvedge warps, the presser foot 7 extends and clamps the weft yarn. Then the scissors 5 cuts off the weft yarn about 11 mm from the first warp yarn., the weft yarn is clamped and cut off, and the crochet hook 6 also rotates between the upper and lower shed. With the relative movement of the crochet hook and the presser foot holder, the weft yarn is caught by the crochet hook, and the weft tail follows the crochet hook from the presser holder into the cloth selvedge.
The tuck-in device used on other rapier looms differ from the one on the Thema loom in shape and dimension, but there are also 4 sets of cam mechanisms in the box, only different in the cam form. For example, GTM machine tuck-in uses a grooved cam, SM93 machine tuck-in uses a cylindrical cam, and FAST machine tuck-in uses a disc-shaped radial cam. Their ultimate purpose is to drive three shafts to perform corresponding actions. There are also scissors, presser foot, and crochet hooks, with a slight difference in the shape, but same action process.
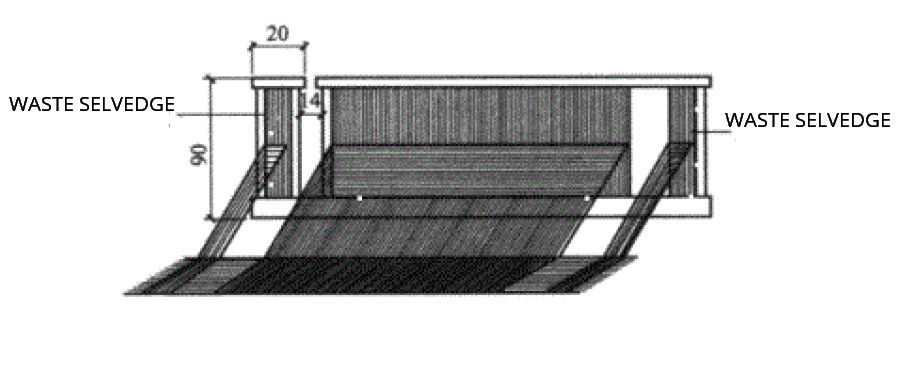
Fig.3 Installation of reed and auxiliary reed
On the left side of the loom, an auxiliary steel reed is used, through which the warps drafted are for waste selvage, so it should be plain structure. The right side generally does not require to use an auxiliary reed. The number of waste selvage warp allocated to both sides must be equal, usually 20 threads for each side, the quantity can be adjusted in different circumstances. The waste selvage warp should be economical, with a certain strength able to stabilize the weft yarn and facilitate the tucking movement.
Of course, if the quality of the selected warp yarn is poor, it is recommended that better quality warps or double-stranded warps should be used for cloth selvage. Fig.4 shows the various solutions used considering the relative density of the warp and weft.
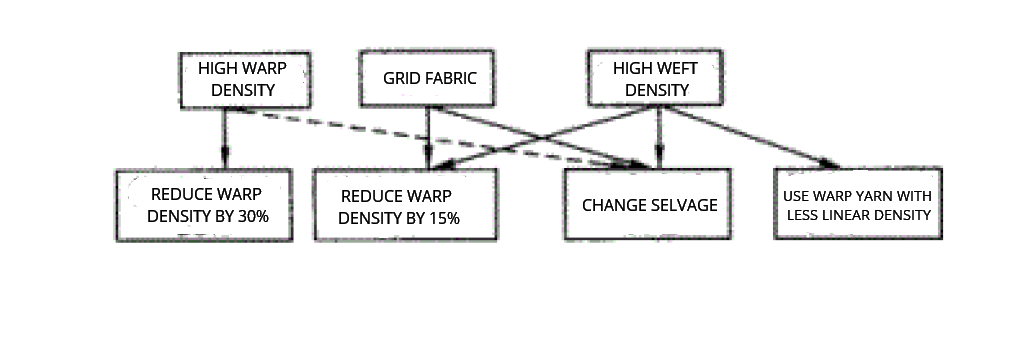
Fig.4 Choose of various selvage solutions
The solid line in Fig.4 indicates that the selvage weave changes from 1/1 to 2/2, and the dashed line indicates that the single strand warp replaced with double strand warp, which can weave more weft yarns than a single strand one.
After installing the tuck-in device, it is recommended to put a few heddles between the cloth edge and the ground structure to change the drafting between the cloth edge and the ground structure. The number of healds depends on the weft tail length to be tucked in, and the additional healds can be removed after weaving.
After the tuck-in device is installed on the loom, the position should be adjusted according to the following steps:
1. At the left and right side of the loom, the distance between the edge of the presser foot and the first warp of the cloth edge is 4-7mm, the proper position to be adjusted automatically during the operation, see Fig.5.
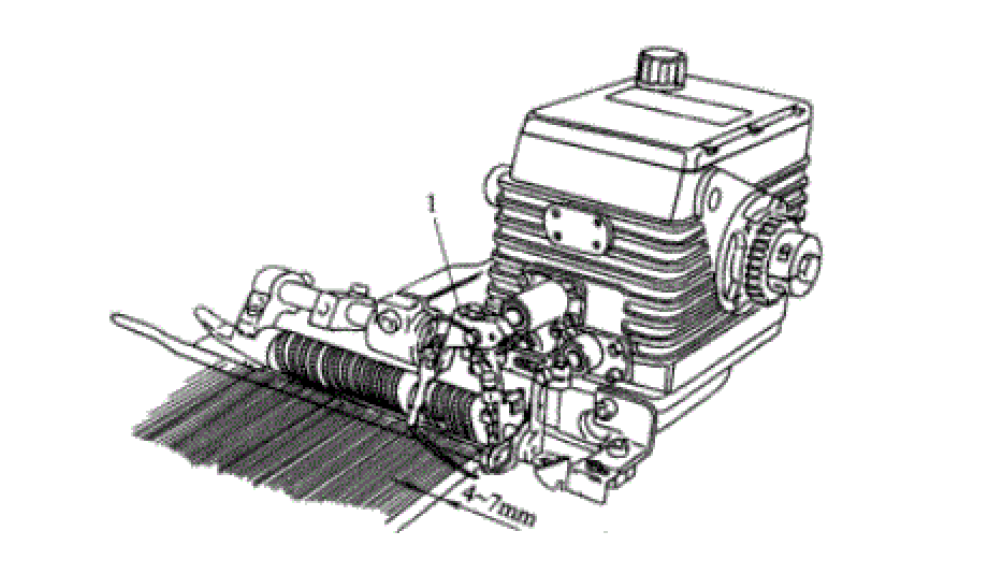
Fig.5 Installation position of tuck-in device
2. In the longitudinal direction of the loom, the semi-circular support and the ring temple should be adjusted to a straight line, see Fig.6.
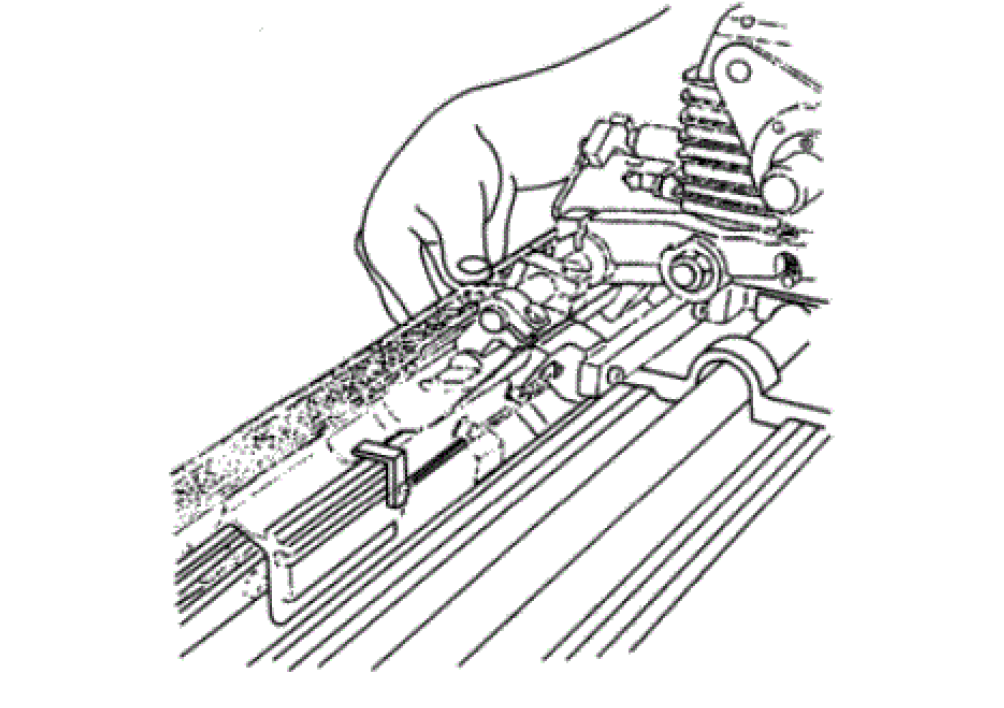
Fig.6 Adjustment of tuck-in device
3. In the vertical direction of the loom, turn the tuck-in device manually to move the presser foot holder horizontally towards the weft yarn, and adjust the height of the device so that the weft yarn is 1 mm below the bottom plane of the presser foot holder. If necessary, insert a spacer between the tuck-in device and the base. In the meantime, make sure there is a gap between the semi-circular support 2 and the rapier guide hook 3 on the loom (Fig.7). Adjust the tuck-in device to the correct position according to the above steps. These operations are achieved by screws 4--connecting the base 5 and the gear base 7; screws 6--connecting the gear base 1 and the breast beam of the loom, see Fig.7.
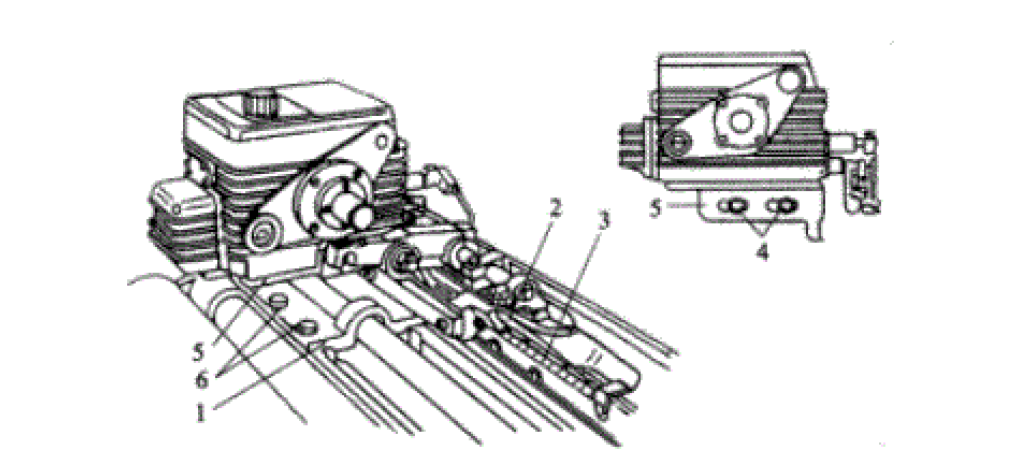
Fig.7 Location of tuck-in device
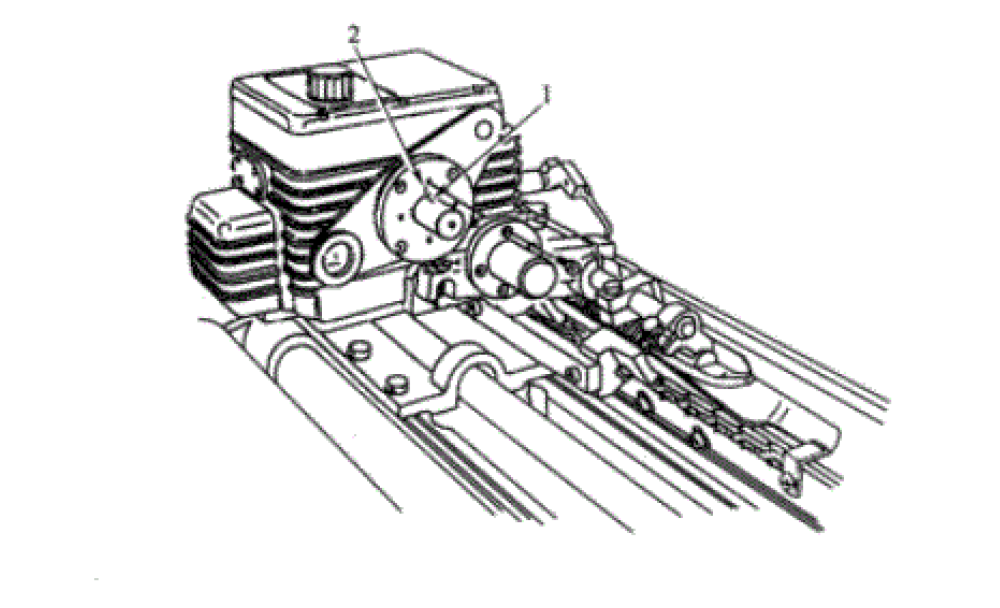
Fig.8 Instruction of tuck-in device adjustment position
2. Turn the loom to the beating-up position 0°.
3. Connect the tuck-in device to the motion of the loom with the proper transmission mechanism. For example, when equipped with Thema 11 loom, the left side of tuck-in device is driven by gear with synchronous belt, and the right side of tuck-in device is driven by gear. Ensure that these transmission mechanisms move flexibly and have a certain clearance.
It is recommended to check the synchronization by manual inching the loom and ensure that there is no collision between the reed and the moving parts at the front end of the tuck-in device.
1. Turn the tuck-in device till the presser foot holder and the presser foot retract to the position closest to the box.
2. Loosen the screw 1 on the scissors' swing arm and the screw 2 on the small swing arm, see Fig.9.
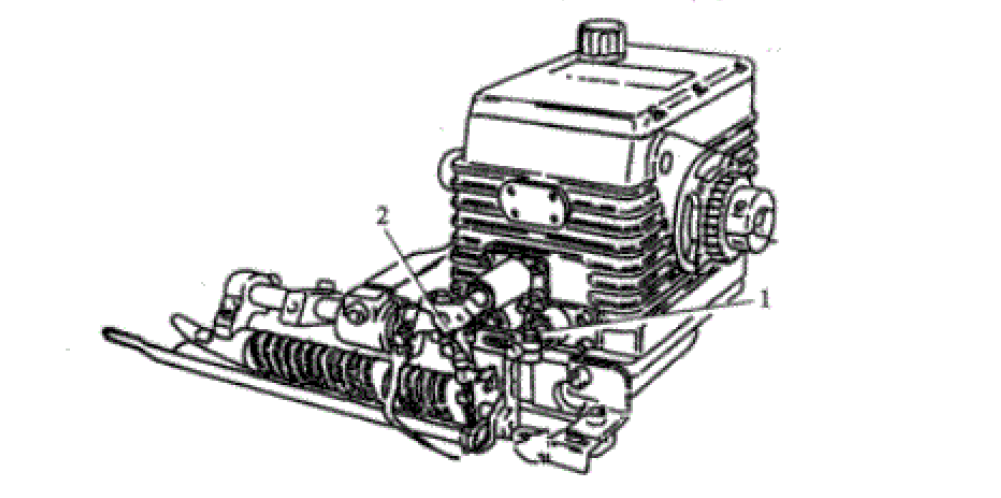
Fig.9 Adjustment of scissors swing arm screw
3. Position the scissors swing arm and the small swing arm according to Fig.10, and then tighten the screws 1 and 2.
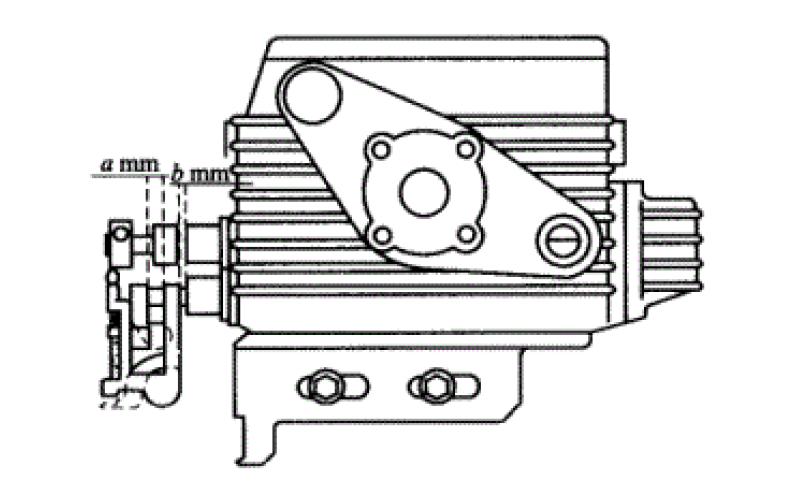
Fig.10 The position of the scissors swing arm and the small arm
If warp buckling appears during weaving, the presser foot can be moved slightly toward the reed. The looms and reeds are first positioned at the beating-up position at 0°. When moving the presser foot, be careful not to touch the steel reed, and loosen the screws 1 and 2 when moving to ensure that the position of the scissors swing arm and the small arm are equal, tighten the screw after moving in place. In this way, the presser foot and the corresponding scissors opening can be kept in a vertical position. After the above operation is completed, the tuck-in device needs to be rotated till the presser foot and the crochet hook are retracted closet to the box to ensure the correct positioning of crochet hook seat.
4. Adjustment of crochet seat and crochet hook
Before the installation of tuck-in device, the crochet seat's positions and the crochet hook should have been preliminarily positioned. After installation, further inspection and adjustment are required, by following steps--
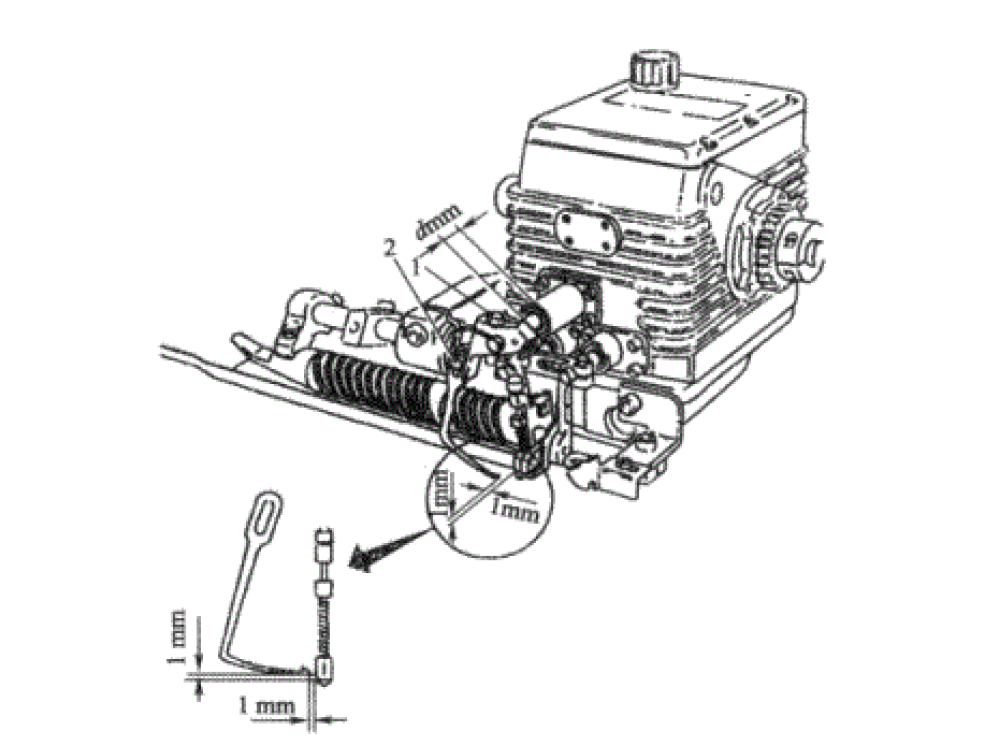
Fig.11 Adjustment of crochet seat and crochet hook
After the adjustment, check whether the presser foot opening plate works properly to avoid interference with the presser foot holder or incorrect opening of the presser foot.
Generally, the size of the opening between the presser foot and the presser foot holder should be 2-3 mm.
5. Adjustment of waste edge device
The height of the waste edge device is adjusted by screw 1, and the longitudinal depth is adjusted by screw 2, see Fig.12.
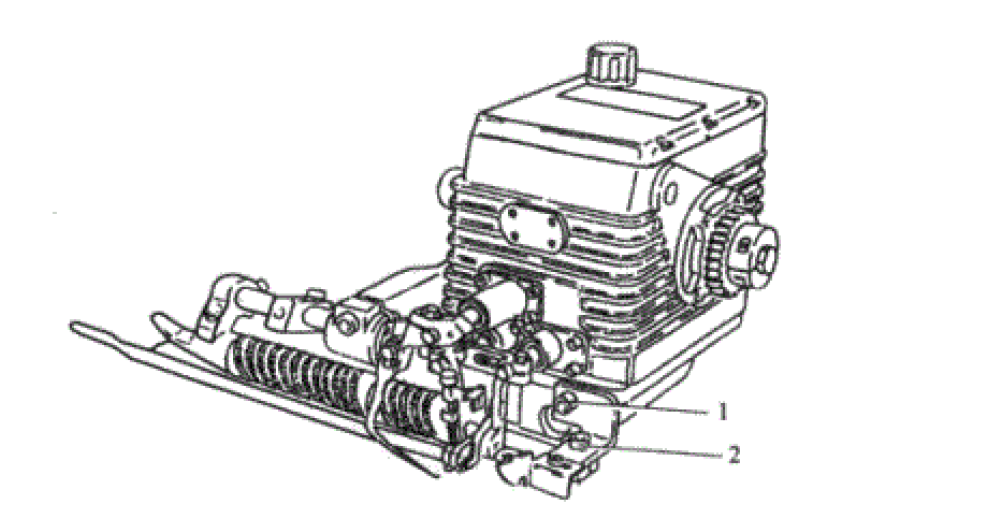
Fig.12 Adjustment of waste edge device
The weft woven into the waste edge should be aligned with the weft woven into the ground structure.
When adjusting the longitudinal depth, it should be noted that the waste edge device should not touch the reed when the auxiliary reed is at the beating position--loom 0 degree.
For other models of tuck-in devices, the installation and adjustment are similar; the installation steps are the same, only a slight difference in the specific parameters.
Every one week: Check the lubricant mark on the side of the tuck-in device. Supplement in time if lubricant is reduced. Manually lubricate the transmission gear of the tuck-in device with NLGl3, XM3 or similar grease.
Check the lubricant used every 5000h or annually, use a spray gun to exhaust the lubricant in the device; inject the cleaning oil, and then exhaust again; add new lubricant. The lubricant in newly purchased tuck-in device should be replaced immediately after the first month of use.
Check the NLGl3 or XM3 grease in the gear holder and add once needed.
The Function and Requirements of the Tuck-in Device
Function
The Tuck-in device is an auxiliary device applied to the rapier loom, projectile loom air-jet loom, or other shuttleless looms for the formation of a tucked selvedge fabric. As shuttleless looms adopt external weft supply, the weft yarn bobbin is located static outside the weaving shed. When the weft cutter cuts weft thread, a tail of weft is left outside the fabric edge and becomes a rough edge fabric. After installation of the tuck-in device, the weft tails outside the fabric edge will be inserted in the shed with the crochet hook, and then woven into the fabric edge by beating-up mechanism, forming a neat and clean selvedge. The appearance and grade of fabric are improved. Selvage tuck-in devices are commonly used in the weaving of high-end fabrics and are mostly applied in the worsted spinning industry.Requirements
1. The tuck-in device itself has no power source, and its drive comes from the loom. Generally, the weft cutter shaft on the loom is used to transmit the driving force through gears, timing belts, couplings, universal joints, etc. Chain drive is generally not used, as the movement law of the tuck-in device should be in coordination with the movement law of the weaving reed to avoid the collision. However, the instantaneous transmission ratio of the chain drive is not constant, and the complete synchronization between the tuck-in device and the loom cannot be guaranteed; hence there is a risk of collision at certain times, so generally, the chain drive is not used.2. The selvedge tuck-in device should keep synchronous motion with the loom to ensure that the weaving crankshaft rotates for one time, the tuck-in device completes a tuck-in action--hooking the weft tail of the previous picking into the weaving shed. At present, the rotation speed ratio of all the tuck-in device and the loom is 1:1.
3. The installation position of the tuck-in device should be reserved on the chest beam of the loom. Ensure that the tuck-in device can reach the corresponding position matching the front, back, up, and down directions of the weave shed, and the position should be adjustable in the widthwise direction. The installation should be firm to ensure that no large vibration during running.
4. The tuck-in device is equipped with its own scissors for weft cutting. Therefore, the fabric retainer plate of the loom should be movable, and the length adjustable. Each time weaving, the fabric retainer plate should be adjusted precisely matching the reed width to avoid hindering the tuck-in device's movement. For a loom without installation of a tuck-in device, the fabric retainer plate can be a fixed type or movable type, but the movable type must be used after the tuck-in device is installed.
5. The form of weft cutter must match with the tuck-in device. The weft cutter should be bent toward the weft insertion side to shorten the distance between the weft cutter and the tuck-in device's scissors on the weft insertion side; this distance is the width of the waste edge. That is to say; the weft yarn utilization rate can be improved after bending the weft cutter, as shown in Fig.1.

Fig.1 Fig.1 Bending structure of weft cutter
6. The tuck-in device will occupy the position of previous temples, so the temples' installation method has to be changed. The model and style temples should match with the tuck-in device and connects to the base tuck-in device.
7. Various types of independent waste edge devices are used; some are fixed on the loom chest beam, and some are installed in front of the heald frame. The installation of tuck-in device will occupy the position of waste edge on the chest beam. Therefore, if the tuck-in device is to be used, the independent waste edge device must be installed in front of the heald frame, or a new design for the original independent waste edge.
Type, Structure and Technical Specifications of Tuck-in Device
Type
According to the type of looms, there are tuck-in devices for rapier looms, projectile looms, and air-jet looms, etc. According to usage, there are tuck-in devices for weaving conventional fabrics and special fabrics, such as industrial fabrics with very loose weft density. According to the use of reed width, there are tuck-in devices for narrow width, with only one left and right side tuck-in; and for wide width, with not only one left and right side tuck-in, but also one or more middle tuck-in.Structure and principle of motion
The tuck-in device consists of four parts--connection, transmission, box, and execution. The connection part fixes the tuck-in device to the corresponding position on the loom, and the transmission component transmits the power from the loom to the tuck-in edge. The connection and transmission are different according to the various models of looms.The tuck-in device has many models due to different uses and different models of looms, each with different structures. But the most used tuck-in device is to weave fine wool fabric on rapier looms. Below is the tuck-in device used on the SOMET Thema Excel loom, illustrating the structure and principle of the box and execution parts.
The device consists of two tuck-ins, left and right, placed on both sides of the cloth edge, and used in pairs. Fig.2 shows the tuck-in device.

Fig.2 Structure of Tuck-in Device
There are 4 sets of conjugate cams in the housing 1, controlling the axial reciprocating movement of the crochet shaft 2, the presser foot shaft 3, the scissors shaft 4, and the movement of the crochet shaft through the swing arm and connecting rod. The execution mechanisms of crochet hook 6, the presser foot 7, and the scissors 5 are installed respectively on three shafts, through which the actions of pressing, shearing, and hooking can be conducted.
After the introduced weft yarn beaten up by the weaving reed and woven by the selvedge warps, the presser foot 7 extends and clamps the weft yarn. Then the scissors 5 cuts off the weft yarn about 11 mm from the first warp yarn., the weft yarn is clamped and cut off, and the crochet hook 6 also rotates between the upper and lower shed. With the relative movement of the crochet hook and the presser foot holder, the weft yarn is caught by the crochet hook, and the weft tail follows the crochet hook from the presser holder into the cloth selvedge.
The tuck-in device used on other rapier looms differ from the one on the Thema loom in shape and dimension, but there are also 4 sets of cam mechanisms in the box, only different in the cam form. For example, GTM machine tuck-in uses a grooved cam, SM93 machine tuck-in uses a cylindrical cam, and FAST machine tuck-in uses a disc-shaped radial cam. Their ultimate purpose is to drive three shafts to perform corresponding actions. There are also scissors, presser foot, and crochet hooks, with a slight difference in the shape, but same action process.
Technical Specifications
- Installation position--top type, one head on each side of the cloth selvedge, the middle tuck-in installed in the center of the whole width.
- Applicable speed--for rapier loom use, speed≤430r/min; for air-jet loom use, speed≤600r/min.
- The width of the tuck-in area: ≥14 mm.
- Power rating--all tuck-in devices are basically the same, about 0.1 kW at 430r/min for each head.
Installation and Application of Tuck-in Device
Installation instructions of weaving reed and auxiliary reed
The installation instruction of weaving reed and auxiliary reed as shown below in Fig.3.
Fig.3 Installation of reed and auxiliary reed
On the left side of the loom, an auxiliary steel reed is used, through which the warps drafted are for waste selvage, so it should be plain structure. The right side generally does not require to use an auxiliary reed. The number of waste selvage warp allocated to both sides must be equal, usually 20 threads for each side, the quantity can be adjusted in different circumstances. The waste selvage warp should be economical, with a certain strength able to stabilize the weft yarn and facilitate the tucking movement.
The structure of the cloth selvage
The tuck-in device hooks the weft tail of one pick to the fabric selvage, so that the weft tail can be woven into the shed together with the following pick in the subsequent beat-up; hence the weft density in the area of the tuck-in selvage becomes twice that of the remaining part of the fabric. To obtain a better weaving result and avoid problems in the upcoming finishing process, some measures must be taken. Under normal circumstances, the fabric will not have fewer warp ends than weft picks in each centimeter. Checkered fabrics or high weft density fabrics will cause higher tension due to bigger shrinkage; thus the risk of warp breakage on the cloth edge is also higher during weaving. As the cloth edge structure is different from the structure of the fabric itself, the upcoming fabric finishing process may also meet some difficulty. Here are some methods that can be taken:- Reduce the number of warps in the cloth edge area.
- Change the weaving method of the cloth edge area.
- Use high-quality warp yarn in the cloth edge area.
Of course, if the quality of the selected warp yarn is poor, it is recommended that better quality warps or double-stranded warps should be used for cloth selvage. Fig.4 shows the various solutions used considering the relative density of the warp and weft.

Fig.4 Choose of various selvage solutions
The solid line in Fig.4 indicates that the selvage weave changes from 1/1 to 2/2, and the dashed line indicates that the single strand warp replaced with double strand warp, which can weave more weft yarns than a single strand one.
After installing the tuck-in device, it is recommended to put a few heddles between the cloth edge and the ground structure to change the drafting between the cloth edge and the ground structure. The number of healds depends on the weft tail length to be tucked in, and the additional healds can be removed after weaving.
Installation and adjustment of the tuck-in device
Take the tuck-in device of Thema Excel rapier loom as an example.Installation position on the loom
The first thing to note--do not move the crochet base 1 when installing the tuck-in device, as the opening between the presser foot and the presser foot base is controlled by the presser foot opening plate on the crochet base.After the tuck-in device is installed on the loom, the position should be adjusted according to the following steps:
1. At the left and right side of the loom, the distance between the edge of the presser foot and the first warp of the cloth edge is 4-7mm, the proper position to be adjusted automatically during the operation, see Fig.5.

Fig.5 Installation position of tuck-in device
2. In the longitudinal direction of the loom, the semi-circular support and the ring temple should be adjusted to a straight line, see Fig.6.

Fig.6 Adjustment of tuck-in device
3. In the vertical direction of the loom, turn the tuck-in device manually to move the presser foot holder horizontally towards the weft yarn, and adjust the height of the device so that the weft yarn is 1 mm below the bottom plane of the presser foot holder. If necessary, insert a spacer between the tuck-in device and the base. In the meantime, make sure there is a gap between the semi-circular support 2 and the rapier guide hook 3 on the loom (Fig.7). Adjust the tuck-in device to the correct position according to the above steps. These operations are achieved by screws 4--connecting the base 5 and the gear base 7; screws 6--connecting the gear base 1 and the breast beam of the loom, see Fig.7.

Fig.7 Location of tuck-in device
Synchronization adjustment of tuck-in device and loom
1. Before the tuck-in device is connected to the loom, manually rotate the tuck-in device until the reference mark 1 on the shaft and the reference mark 2 on the flange installed on the box are aligned with each other, see Fig.8. At this time, the crochet hook and the presser foot holder should retract to the rearward position closest to the box.
Fig.8 Instruction of tuck-in device adjustment position
2. Turn the loom to the beating-up position 0°.
3. Connect the tuck-in device to the motion of the loom with the proper transmission mechanism. For example, when equipped with Thema 11 loom, the left side of tuck-in device is driven by gear with synchronous belt, and the right side of tuck-in device is driven by gear. Ensure that these transmission mechanisms move flexibly and have a certain clearance.
It is recommended to check the synchronization by manual inching the loom and ensure that there is no collision between the reed and the moving parts at the front end of the tuck-in device.
Adjustment of the presser foot
Before the tuck-in device is installed, the position of the presser foot should be positioned. After installation, it is necessary for further check and adjusting the fitness of the position by following steps--1. Turn the tuck-in device till the presser foot holder and the presser foot retract to the position closest to the box.
2. Loosen the screw 1 on the scissors' swing arm and the screw 2 on the small swing arm, see Fig.9.

Fig.9 Adjustment of scissors swing arm screw
3. Position the scissors swing arm and the small swing arm according to Fig.10, and then tighten the screws 1 and 2.

Fig.10 The position of the scissors swing arm and the small arm
If warp buckling appears during weaving, the presser foot can be moved slightly toward the reed. The looms and reeds are first positioned at the beating-up position at 0°. When moving the presser foot, be careful not to touch the steel reed, and loosen the screws 1 and 2 when moving to ensure that the position of the scissors swing arm and the small arm are equal, tighten the screw after moving in place. In this way, the presser foot and the corresponding scissors opening can be kept in a vertical position. After the above operation is completed, the tuck-in device needs to be rotated till the presser foot and the crochet hook are retracted closet to the box to ensure the correct positioning of crochet hook seat.
4. Adjustment of crochet seat and crochet hook
Before the installation of tuck-in device, the crochet seat's positions and the crochet hook should have been preliminarily positioned. After installation, further inspection and adjustment are required, by following steps--
- Manually rotate the tuck-in device to make the crochet hook extend as far as possible from the box toward the position of the presser foot.
- Loosen screw 2 to position the crochet hook at a suitable position on the crochet seat. At this time, the end of the crochet hook should be 1 mm higher than the upper surface of the presser foot in the vertical direction and then tighten the screw 2.
- The crochet seat should be positioned according to the dimension d shown in Fig.11, and the distance between the end of the crochet hook and the side of the presser foot should be 1 mm. Then tighten the screw 1.

Fig.11 Adjustment of crochet seat and crochet hook
After the adjustment, check whether the presser foot opening plate works properly to avoid interference with the presser foot holder or incorrect opening of the presser foot.
Generally, the size of the opening between the presser foot and the presser foot holder should be 2-3 mm.
5. Adjustment of waste edge device
The height of the waste edge device is adjusted by screw 1, and the longitudinal depth is adjusted by screw 2, see Fig.12.

Fig.12 Adjustment of waste edge device
The weft woven into the waste edge should be aligned with the weft woven into the ground structure.
When adjusting the longitudinal depth, it should be noted that the waste edge device should not touch the reed when the auxiliary reed is at the beating position--loom 0 degree.
For other models of tuck-in devices, the installation and adjustment are similar; the installation steps are the same, only a slight difference in the specific parameters.
Maintenance of Tuck-in Device
Lubrication
Tuck-in devices must be fully lubricated before use. Each head requires about 450g of oil, and add lubricant till the upper part of the lubricant mark. DMALA OIL 150 lubricant or similar lubricant is preferred.Every one week: Check the lubricant mark on the side of the tuck-in device. Supplement in time if lubricant is reduced. Manually lubricate the transmission gear of the tuck-in device with NLGl3, XM3 or similar grease.
Check the lubricant used every 5000h or annually, use a spray gun to exhaust the lubricant in the device; inject the cleaning oil, and then exhaust again; add new lubricant. The lubricant in newly purchased tuck-in device should be replaced immediately after the first month of use.
Check the NLGl3 or XM3 grease in the gear holder and add once needed.

 English
  한국어
한국어  português
  العربية
  tiếng việt
  ไทย
ไทย  Malay
Malay  हिंदी
हिंदी  Indonesia
  বাঙালি
  اردو
اردو 
